Gestionar depósitos
Requiring fixed deposits is common in many rental scenarios, such as collecting security deposits. Security deposits are insurance in case of damage, theft, or unpaid fees. It is typically refunded when the rented product is returned in good condition, and all terms of the rental or service agreement are met.
This document covers the standard options for configuring, collecting, and refunding deposits within the Rentals app.
App integration configuration
The following apps are essential for configuring deposit service products and processing deposit refunds:
Sales: Enables the Price tab on product forms when Gestionar precios is enabled. Also enables the use of quotation templates.
Accounting: Enables the use of Credit Notes on rental orders, which are required when returning a deposit.
Configuración
For every rental product that requires a deposit, a second product must be configured specifically for the deposit.
Example
When configuring a digital camera rental that requires a deposit, two products must be
configured: Digital Camera Rental and Digital Camera Rental Deposit products.
Truco
Including the product name within the deposit service product name improves organizational clarity and simplifies deposit tracking.
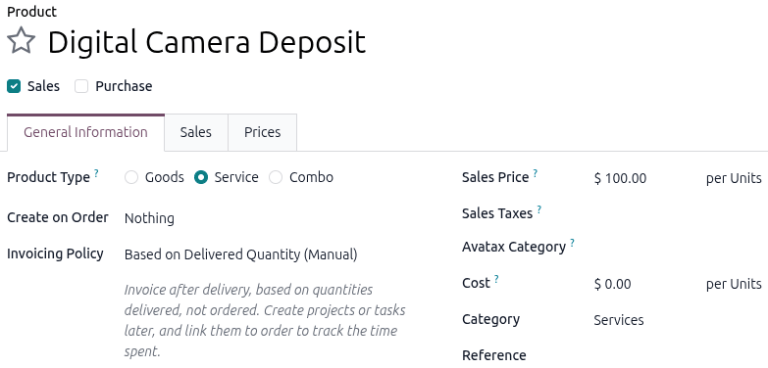
Go to , click New, and clearly name the service product as a deposit.
Next, set the Product Type to Service, the Invoicing Policy to Based on Delivered Quantity (Manual), and Sales Price to the desired deposit amount, and the unit of measure to Units.
Choose whether to include Sales Taxes for the deposit service product. Finally, (save) the deposit service product.
Add a deposit to a rental order
There are several methods to add a deposit service product to a rental order, alongside the related product:
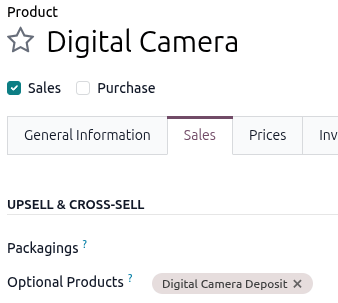
Optional product menu
To configure an optional product for a deposit, select the desired product or create one. On the product’s form, click the Sales tab and add the product configured as the deposit to the Optional Products field in the Upsell & Cross-sell section.
Nota
If creating a new product, be sure to configure the rental product’s prices on the Prices tab.
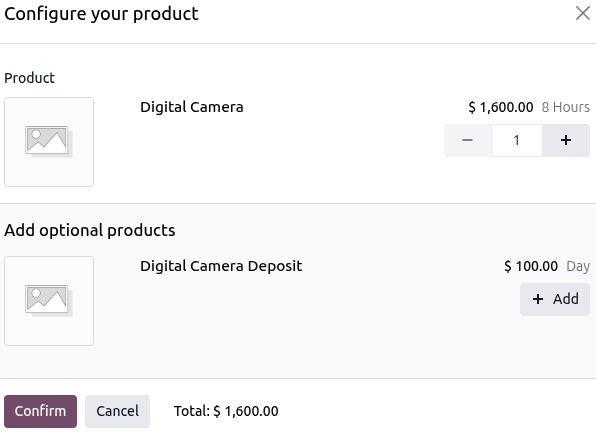
Then create a rental order and add the rental product in the Order Lines tab. A Configure your product pop-up window appears. Click Add, for the deposit item, then click Confirm.
Truco
If eCommerce is installed, add a Short Description to the rental product’s Sales tab stating a deposit is required.
When a customer adds the rental product to their cart, a Configure pop-up window displays the deposit service product under Available options.
Once the customer clicks Add to Cart, the rental product and the deposit service product are added to their cart.
Quotation template
Using quotation templates helps tailor the product list to the customer while ensuring the necessary deposits are included in the order. Navigate to and click New to get started.
Create a quotation template that includes both the rental product and the rental product deposit, and save the template. Next, create a rental order. Select the desired template in the Quotation Template field.
Process a deposit on a rental order
Once the rental order is confirmed by the customer, the deposit should be invoiced either before or at the time the customer picks up the rented product.
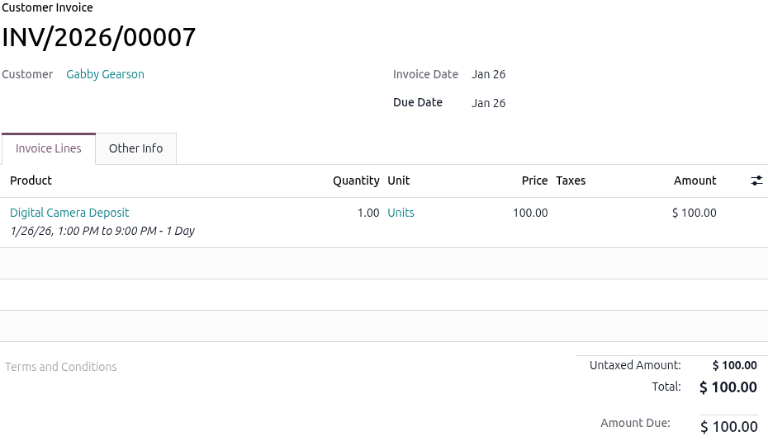
To do so, change the Delivered column for the deposit service product to 1. The text
color changes from black to blue, indicating that the line is ready for invoicing.

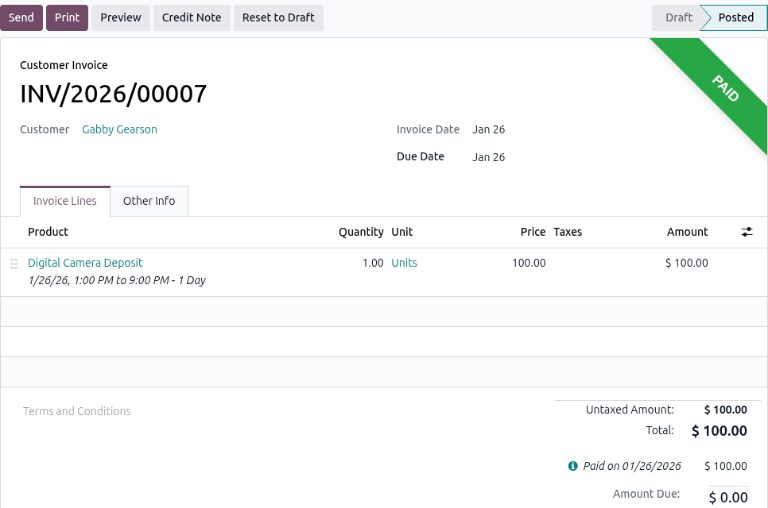
Click Create Invoice and select Regular invoice from the Create invoice(s) pop-up window. Click Create Draft to generate the invoice. After verifying that the draft is correct, click Confirm, then click Send to email the invoice to the customer.
For in-person transactions, click Pay, verify the Pay pop-up window, then click Create Payment and click Send to email a copy of the receipt.
Reembolsar depósitos al devolver los productos
To process a deposit return, the Accounting app must be installed. After a customer returns the rented item, begin the deposit return by preparing a credit note against the original deposit invoice.
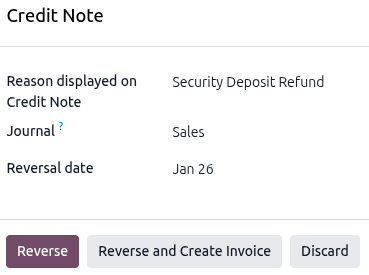
First, go to the , and select the correct rental order. Click the Invoices smart button, find the invoice for the deposit, and issue a credit note.
Example
When creating a credit note, enter Security Deposit Refund in the Reason displayed
on Credit Note field in the Credit Note pop-up window.
Return to the rental order using the Sales Orders smart
button. For the deposit order line, change the Delivered quantity from 1 to 0. This
step ensures the deposit is marked as returned.
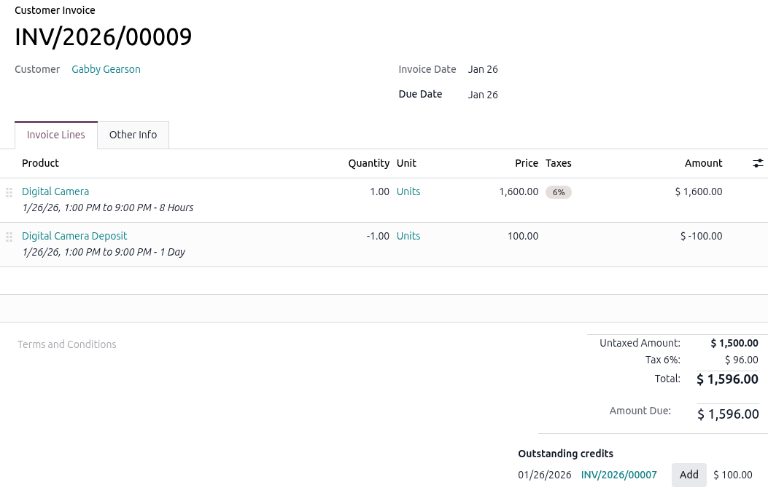
Then, review any rental refunds due before creating a final invoice for the remaining charges by clicking Create Invoice.
In the draft invoice, the deposit line will appear as a negative amount, which shows the amount to refund. At the bottom, review the Outstanding Credits section for the credit note created for the deposit refund.
Click Add to apply these credits to the invoice. This completes the refund process.
Invoice the remaining rental charges
On the new invoice draft, the Total amount displays the applied credit note amount and deposit date. After verifying the totals, click Confirm to finalize the invoice.
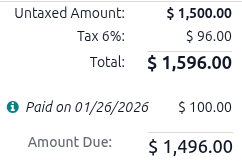
Click Send to email the final invoice to the customer. For in-person transactions, click Pay to process the payment.