Basic SMS setup
Odoo SMS Marketing allows users to send SMS text messages in one of two ways:
Using Odoo’s out-of-the-box IAP service.
Using a third-party Twilio integration.
The following documentation covers the configuration process for users to send SMS messages using Odoo IAP.
Built-in SMS configuration
In Odoo, SMS text messaging is an IAP service that sends messages directly from the database using prepaid IAP credits.
Each time a user sends an SMS message in Odoo, credits are deducted from the database’s IAP account. The pricing of the message depends on the destination and number of characters in the message. See Odoo SMS - FAQ for a list of prices per country.
The built-in SMS option allows users to send messages immediately with minimal configuration. The following steps explain how to set it up and use it.
Tip
Users needing more extensive configuration or that must adhere to stricter compliance regulations (e.g., in the US or Canada) may use Twilio instead, although pricing may vary from the built-in option.
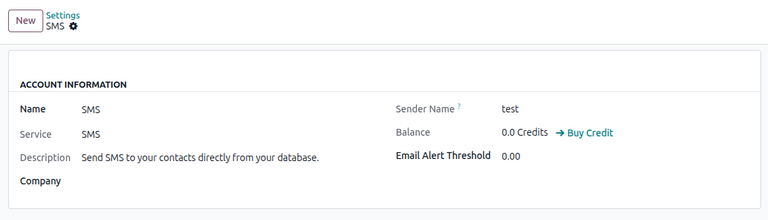
Register SMS account
Before SMS messages can be sent, an SMS account must be registered through the IAP service and purchase the required credits needed to send SMS messages.
To register an SMS account, open the Settings app and scroll to the Contacts section. Under the Send SMS field, make sure the Send via Odoo option is selected. Then, click Manage Service & Buy Credits to open the SMS account settings page.
Note
The Send via Odoo only appears if the Twilio module is installed. An additional Send via Twilio option also appears.
For first-time users, a highlighted warning message appears at the top of the page, indicating the account is not registered. Click Register next to the message to register an SMS account, and a Register Account pop-up window appears. Enter a mobile phone number to receive an SMS verification code. Once entered, click Send verification code.
After receiving the code, enter it in the Verification Code field. Then, click Register to continue.
On the Choose your sender name pop-up window, enter a sender name between 3 and 11 alphanumeric characters. Once set, this name cannot be modified.
Once entered, click Set sender name. Alternatively, click Skip for now to continue without setting a sender name.
Note
If a sender name is not set, SMS messages are sent from a short code. A Set Sender Name option appears on the SMS account settings page for the user to configure when desired.
Purchase credits
To purchase credits, open the Settings app and scroll to the Contacts section. Ensure that Send via Odoo is selected under Send SMS, then click Manage Service & Buy Credits.
On the SMS account settings page, click Buy Credit next to the Balance field.
The user is then directed to a Buy credits for SMS page on the IAP portal, displaying various credit packs available for purchase.
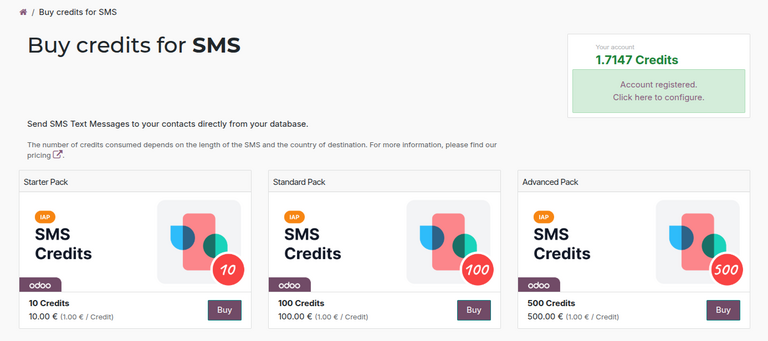
To purchase credits, click Buy under the desired credit pack. Then, follow the prompts on the Odoo payment page to finalize the order.
Note
The SMS account settings page can also be accessed by navigating to the Settings app, scrolling to the Contacts section, then clicking View My Services under Odoo IAP.
On the resulting dashboard of IAP accounts in the database, select SMS to open the SMS account settings page.
Testing
After configuration, users can test that the SMS service works by sending a test marketing campaign message or by sending an SMS directly from a contact form.
Marketing campaign test message
To send a test SMS message, open the SMS Marketing app. Select an existing SMS marketing campaign or create a new one.
Ensure there is text in the SMS Content tab of the campaign form, then click Test. A Test Mailing pop-up window appears.
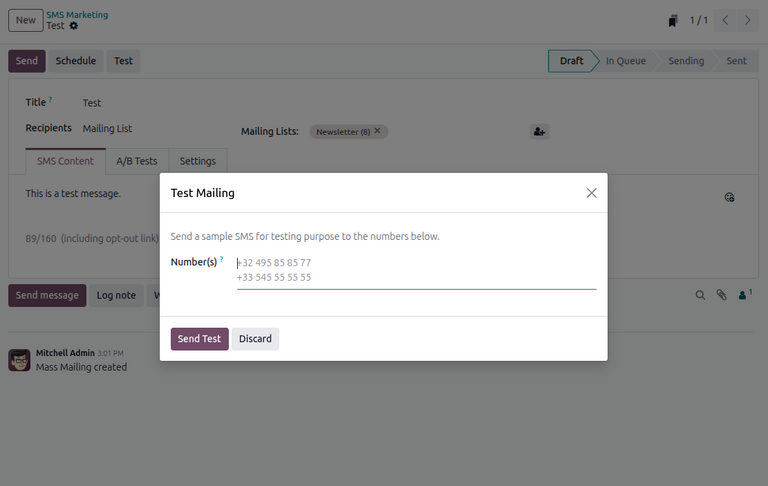
Enter a test mobile number, then click Send Test. The user can then verify that an SMS message has been sent.
Note
In the Settings tab of the campaign form, the user can choose to include an opt-out link in the SMS message. Note that this link counts towards the pricing of the message.
Contact form test message
Alternatively, users can also test SMS messages by directly sending a real message through a contact form. To do this, open the Contacts app and select a contact record. Click the (gear) icon and select Send SMS. A Send SMS pop-up window appears.
Enter a message in the text box, then click Send.
The user can then verify that an SMS message has been sent in the chatter next to the contact form.
See also